
Latest News

The Ultimate Guide to Crispy Homemade Spring Rolls: Chicken or Beef
Thursday, 21 May 2026 - 17:56 | Views - 183
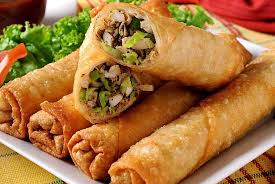
There is nothing quite like a perfectly shattered, golden-brown spring roll wrapper giving way to a savory, steaming, seasoned meat and vegetable filling. While takeout versions often turn soggy or taste mostly of cabbage, making them at home lets you control the quality, maximize the crunch, and pack them with flavor.
Whether you prefer juicy chicken or deeply savory beef, this guide will give you the foolproof recipe and the essential culinary secrets to mastering the perfect spring roll.
The Recipe: Chicken or Beef Spring Rolls
This recipe makes about 20 to 25 standard-sized spring rolls. You can easily double the batch and freeze half for later.
Ingredients
The Protein (Choose One):
-
Chicken Version: 1 pound ground chicken OR finely minced chicken breast
-
Beef Version: 1 pound lean ground beef OR thinly sliced ribeye/flank steak cut into tiny ribbons
The Aromatics and Veggies:
-
2 tablespoons neutral oil for cooking (vegetable, canola, or grapeseed)
-
3 cloves garlic, minced
-
1 tablespoon fresh ginger, grated
-
2 cups green cabbage, shredded very finely
-
1 cup carrots, julienned or shredded
-
4 wood ear mushrooms or shiitake mushrooms, soaked and finely sliced (optional, for texture)
-
3 green onions (scallions), thinly sliced
The Seasoning Sauce:
-
2 tablespoons soy sauce
-
1 tablespoon oyster sauce
-
1 teaspoon toasted sesame oil
-
Half a teaspoon ground white pepper (or black pepper)
-
Half a teaspoon sugar
The Assembly:
-
1 package of large spring roll wrappers (usually 25 count, thawed if frozen)
-
1 tablespoon cornstarch mixed with 2 tablespoons of warm water (your "glue")
-
High-smoke point oil for deep-frying (peanut, canola, or vegetable oil)
Step-by-Step Instructions
1. Cook the Protein
Heat one tablespoon of oil in a large skillet or wok over high heat. Add your chosen meat (chicken or beef). Cook, breaking it up into very small pieces, until it is completely browned and cooked through. Remove the meat from the pan and set it aside in a bowl, leaving the juices behind.
2. Stir-Fry the Aromatics and Veggies
Add the remaining tablespoon of oil to the same pan. Toss in the garlic and ginger, stir-frying for about 30 seconds until fragrant. Add the cabbage, carrots, and mushrooms. Stir-fry on high heat for 2 to 3 minutes just until the vegetables begin to soften but still retain some bite.
3. Combine and Season
Return the cooked meat to the pan with the vegetables. Pour in the soy sauce, oyster sauce, sesame oil, white pepper, and sugar. Toss everything together for 1 minute so the flavors meld. Stir in the green onions, then remove the pan from the heat.
4. The Critical Step: Drain and Cool
Spread the filling out onto a large baking sheet or a wide colander. Let the filling cool completely to room temperature. Tilt the baking sheet slightly or press the mixture to ensure any excess liquid drains away. A wet filling is the ultimate enemy of a crispy spring roll.
5. Wrap the Spring Rolls
-
Lay one spring roll wrapper on a clean surface so it looks like a diamond (one corner pointing at you). Keep the remaining wrappers covered with a damp paper towel.
-
Place about 2 tablespoons of the cooled filling on the lower third of the wrapper (closest to you).
-
Lift the bottom corner over the filling and tuck it snugly underneath.
-
Roll upward tightly until you reach the center of the diamond.
-
Fold the left and right corners tightly toward the center, creating a neat envelope shape.
-
Continue rolling upward. Dip your finger into the cornstarch slurry and brush it along the top edges of the remaining triangle. Roll all the way to the top to seal the edge securely.
6. Fry to Golden Perfection
Pour about 2 to 3 inches of frying oil into a deep pot or wok. Heat the oil to 350 degrees Fahrenheit.
Carefully lower 4 to 5 spring rolls into the oil at a time (do not overcrowd the pot). Fry for about 4 to 5 minutes, turning occasionally, until they turn a beautiful, uniform golden brown. Remove with a slotted spoon or tongs and place them on a wire cooling rack. Repeat with the remaining rolls.
The Ultimate Dos and Don'ts for Spring Roll Success
The Dos
-
Do buy the right wrappers: Look for wheat-flour based "Spring Roll Pastry" sheets in the freezer section of Asian grocery stores. Do not use Vietnamese rice paper wrappers (which are meant for fresh summer rolls) or thick, bubbly egg roll wrappers if you want authentic, shatteringly crisp spring rolls.
-
Do dry your vegetables: After washing your cabbage and carrots, ensure they are completely dry before they hit the pan.
-
Do wrap tightly: Any air pockets trapped inside the wrapper will fill with steam during frying, which expands and can cause the spring roll to burst open or absorb too much oil.
-
Do use a wire rack for cooling: Placing freshly fried spring rolls on paper towels creates steam underneath them, which immediately softens the bottom crust. A wire cooling rack allows air to circulate, keeping them crispy all the way around.
The Don'ts
-
Don't wrap with hot filling: Putting hot or warm filling onto a cold, thin wrapper will create instant condensation, melting the pastry sheet and making it tear before it ever hits the oil.
-
Don't skip the draining step: If you see any liquid puddle at the bottom of your filling bowl, strain it out. The filling should be moist and flavorful, but never wet or swimming in sauce.
-
Don't overcrowd the frying pot: Dropping too many spring rolls into the oil at once will cause the oil temperature to plummet. Instead of crisping instantly, the wrappers will sit in the lukewarm oil and absorb it, resulting in a greasy, heavy roll.
-
Don't thaw wrappers in the microwave: Let your frozen wrapper package thaw naturally in the refrigerator overnight, or on the counter for 30 minutes. Microwaving them cooks the edges and glues them together, making them impossible to separate without tearing.
Freezing and Reheating Tips
Spring rolls are the perfect make-ahead finger food.
If you want to freeze them, do so before frying. Place the assembled, uncooked spring rolls in a single layer on a parchment-lined baking sheet and freeze them for 2 hours until solid. Once frozen, transfer them to a zip-top freezer bag. They will keep beautifully for up to three months.
When you are ready to eat, do not thaw them. Fry them straight from the freezer in 350-degree oil, adding about an extra 1 to 2 minutes to the total frying time to ensure the frozen center cooks through perfectly.







Monday, 27 July 2026 - 9:40
After years dominated by hyper-saturated trend cycles and sleek, ultra-smooth minimalism, fashion has...

Monday, 20 July 2026 - 9:35
The era of hyper-rigid seasonal dress codes has quietly dissolved. Where personal style once demanded...
Monday, 08 June 2026 - 18:35
There was a time when sleek, unadorned surfaces and flat printed graphics defined what it meant to be...



Thursday, 13 August 2026

Wednesday, 05 August 2026

Thursday, 30 July 2026


Tuesday, 18 August 2026

Tuesday, 28 July 2026

Monday, 20 July 2026

Friday, 15 May 2026